
How to Enhance Audio in Adobe Premiere Pro CC (the easy way)

This page may contain affiliate links. Learn more in our disclaimer.
One of the easiest ways to improve the overall quality of your videos is to enhance the audio in Adobe Premiere Pro. With the newest update of Adobe Premiere Pro CC 2019 there are some simple and effective techniques to take your audio quality to the next level.
As with anything in the Adobe CC suite there are typically many ways to do similar things. I would suggest playing around with all of the techniques below and understanding what each does firsthand. In my experience, I have found that there is no secret formula for getting perfect audio. Getting that sweet sweet ear nectar is more of a trial and error process. However, with that said, rarely have I found myself needing to explore options outside of this list. So enough babbling lets get to it:
*Professional Audio Troll Disclaimer: I am not an audio professional and am not claiming to be, I leave that to the pros. I solely am trying to teach some basic techniques that I have found useful which could help fellow creators explore new areas of Premiere Pro.*
Multiband Compressor
Have you ever been listening to a song or video and been annoyed that you constantly have to keep turning the volume up and down? The problem you are experiencing is in the audio compression. The Multiband Compressor in Premiere works by analyzing the audio track and finding the lowest points and raising the levels and at the same time finding the highest points and lowering the levels of those. This gives a more pronounced bass and smoother treble and solves the issue of the listener having to adjust the audio volume. This is in my opinion one of the best audio effects in Premiere Pro.
So how do you do this in Premiere? In the effects tab search for "Multiband Compressor", make sure to avoid "Multiband Compressor (Obsolete)" as this tool is being phased out with the newest update to Premiere Pro CC 2019. Then drag the effect onto your audio clip.
Once the effect is applied to the audio clip, open the effect controls and click "edit". You will see this screen pop up.
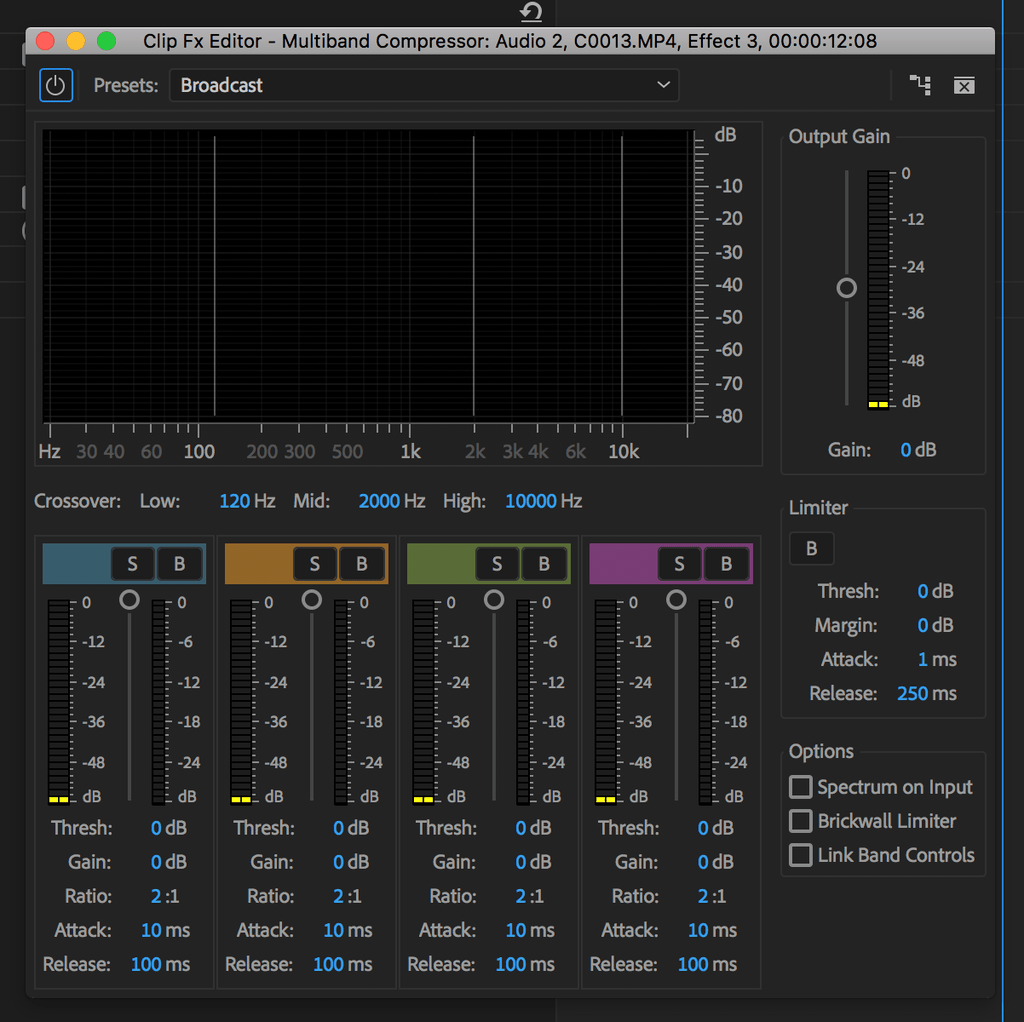
While this may seem intimidating at first do not worry there are only three settings I typically adjust and have found it to work well. First under "Presets" click the drop down and select one of the other presets. Then click the drop down again and click "Broadcast". For some reason when you open it and it appears to say "Broadcast" and you think that the "Broadcast" audio preset is applied, however, hate to break it to you its not. So be careful to make sure you see the settings changing near the bottom of the window.

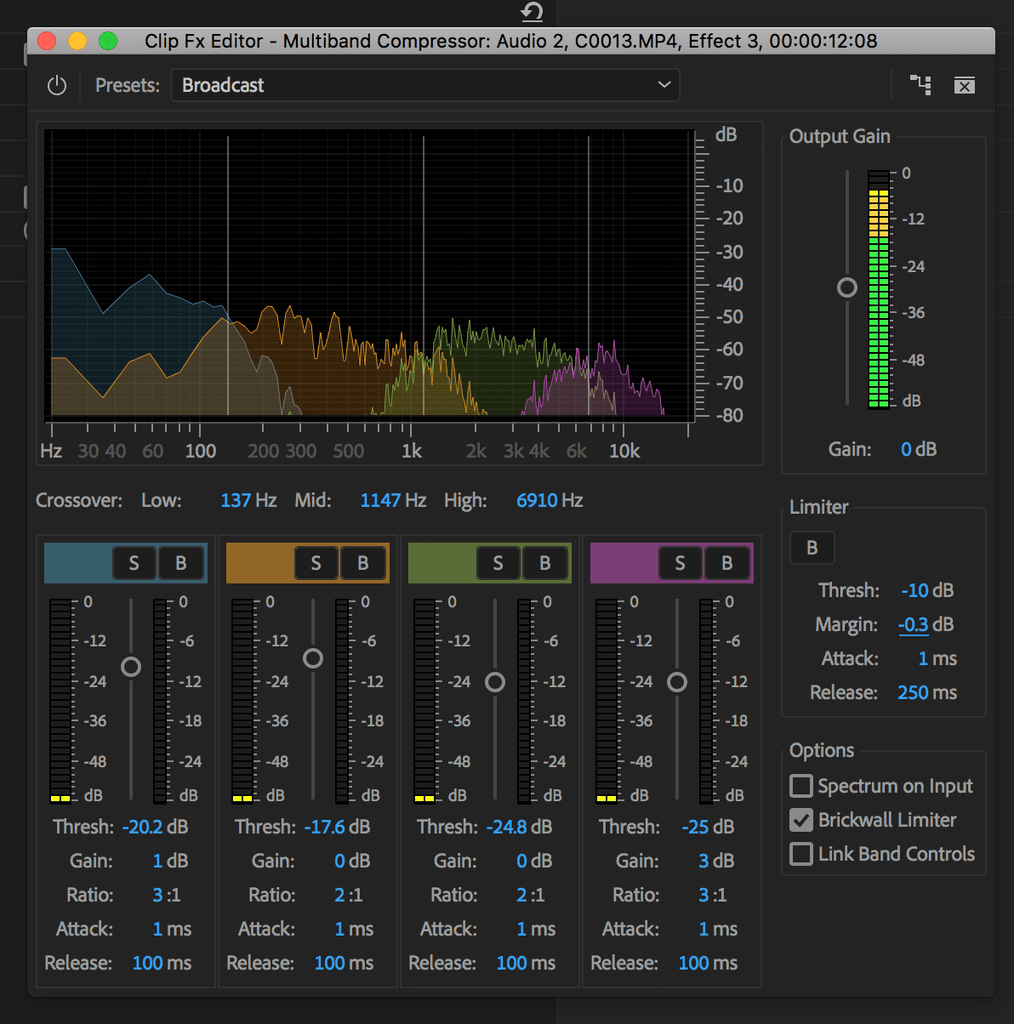
After the preset is applied Next, under the "Limiter" section on the middle right of the window find "Margin", "Attack", and "Release". "Margin" is the decible range the audio is limited by, "Attack" is the attack speed at which the compressor targets an audio signal when the track is analyzed, and "Release" is how fast the compressor releases the signal following compression. I Change "Margin" to -0.3db, "Attack" to 1ms, and "Release" to 250ms. Overtime I have gotten the best results from this combination.
Adaptive Noise Reduction
Another way to improve the audio is by using adaptive noise reduction. Adaptive noise reduction helps when you have subtle background interference. I would not rely on this effect to help you in extreme situations such as loud cars in the background or a buzzing air conditioner. In those instances the compression of the effect seems to be too much sauce and you get a sort of tin canny sound.
To use this effect simply type "Adaptive Noise Reduction" in the effects panel and drag it onto your clip. Following, open the "edit" panel in the effect controls window.

One thing to note with this is that for some reason there is a 1-2 second delay on when the noise reduction kicks in. If you apply it to the clip you can hear it click in. This problem has been noted by many and I hope will be resolved soon in a new update by adobe. However, in some instances where the audio is mostly clean I use the light noise reduction preset selected from the drop down to remove a little bit more of the additional background noise.

How to Fix Blown Out Audio
A major aspect of getting quality audio is to make sure the audio isn't clipping. What does this mean? Clipping occurs when the amplifier tries to deliver an output past its maximum capacity. In these instances the audio falls apart and distorts to strange crackling and unwanted hits. Sounds complicated, luckily its pretty easy to identify in Premiere. With the audio track selected you will see these audio dB bars. When the bars are maxed out as shown below. That means your audio is clipping and needs to be adjusted.
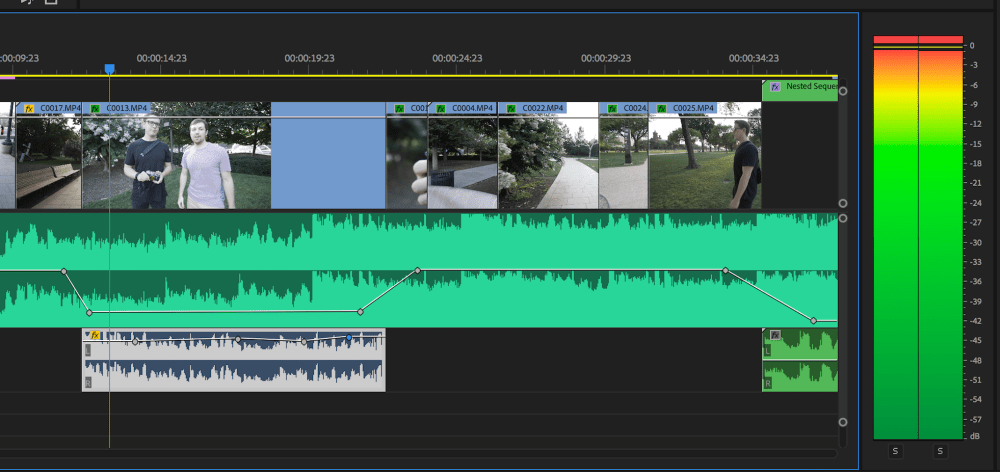
The easiest way I have found to fixing this and gaining full control of your audio is by using audio keyframes. With my audio I typically aim for the maximum output to be less than -3db on the chart. To set audio keyframes expand the audio clip until you see the white line as shown in the figure above. Next, find the audio keyframe button (the hexagon shaped button).

Then, scrub the audio to the point you want to reduce the level and click the keyframe button and drag the keyframe down. Doing so adjusts the overall level of the audio but also gives you control to ramp the audio within a single track to target individual areas which are clipping.

After some trial and error you should be able to achieve a level where the output is averaging around -3db at its maximum and clipping will be avoided.

Get Featured
Interested in sharing your story? Apply to have your work featured with your portfolio and a brief introduction via our Be a Contributor page. We'll look out for your email!
If you enjoyed this article, feel free to check out our YouTube Channel for tutorials, cinematic edits, and client projects!